Think Lasagna!
By Jackie Sledge
Big Country Master Gardener Association
I like color in the landscape, and I really want to have it beginning early in the year when the weather starts to warm up a little. I recently started researching to try to find some early-blooming plants and kept finding lists of bulbs that can provide continuous color for much of the year with blooms starting in early spring.
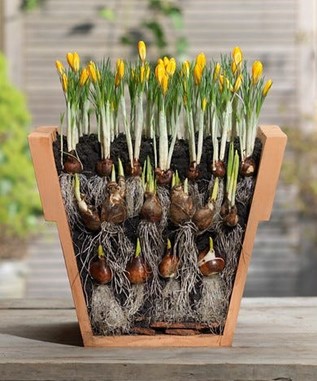
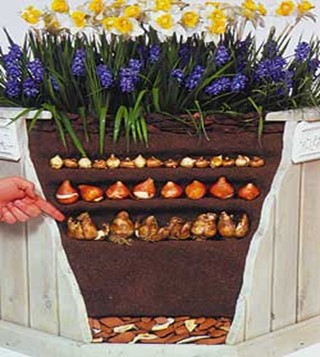
There were also articles on layering or lasagna gardening, and it seems like anything related to food gets my attention! As I quickly discovered, lasagna gardening is similar to the lasagna pasta dish because it also has a lot of layers. Lasagna is loved for its layers of pasta; lasagna gardening is loved for its layers of fall-planted bulbs that begin blooming in early spring. That description was enough to encourage me to find out about the “ingredients” needed as well as the “recipe” to follow to make a bulb lasagna garden.
Let’s start with making a plan for the garden.
- A bulb lasagna garden can be planted in a bed in the ground or in a container on the porch or balcony.
- This is an easily planted project that provides continuous blooms for months. Select bulbs that bloom at different times from early spring into summer, so you always have something to enjoy. The larger bulbs should bloom later in the spring or in summer, the medium-sized ones bloom earlier, and the small bulbs are the first ones to bloom.
- Plant a combination of bulbs in the fall to allow them time to develop good root systems before the cold winter months arrive. The bulbs need freezing or near freezing temperatures so they will germinate early in the spring when the weather begins to warm up.
Now it’s time to plant which means to assemble the “ingredients” and follow the “recipe.”
- I want to plant my bulbs in a container, so I need to select one. It can be any size, but ideally it needs to be one that’s about 12 to 18 inches tall. The container should be about 14” in diameter at the top rim if it’s a round pot to allow room for the layers of bulbs. You can also use a rectangle or square container – whatever you want to use. Be sure the container has sufficient drainage holes, so the bulbs won’t get waterlogged. Cover the bottom of the container with gravel or pieces of broken pots to assist with drainage.


- Be sure you have all the supplies needed to plant inside the container – soil, container, bulbs, tools, and water.
- Separate the varieties of bulbs, and lay them out in the order they will be planted.


- Fill the bottom of the container with a layer of well-draining potting mix or garden soil. Be sure this layer is deep enough to accommodate the roots of the bulbs.
- Plant the first layer of bulbs. These are the largest bulbs, and they bloom the latest in the spring. Place them in the pot with the pointy side up and about a bulb’s distance apart if you want to have a container full of plants. Water the first layer.
- Add another layer of soil. This should be about 2-3 inches deep.
- Plant the next layer of bulbs. These are usually medium-sized bulbs and bloom in mid-spring. Remember to place them with the pointy side up and about a bulb’s distance apart. Water again.
- Add another layer of soil.
- Plant the last layer of bulbs (or the first layer if you’re counting from the top). These are the smallest bulbs, and they bloom in late winter or early spring while the bulbs in the layers underneath sprout later.


- Add the top layer of soil and water again.


Finally, it’s time to finish the container.
- Top the container with mulch to help the soil retain moisture, to cover the bulbs with a blanket for maintaining soil temperature, and to provide a finished look to the pot.
- An alternative topper to the pot is to plant winter annuals on top of the bulb lasagna to provide winter color until the bulbs emerge. I like the look of pansies during the cold months, and they will definitely add winter color to the pot before the bulbs sprout. You can also add mulch around the flowering plants.


A few more container tips.
- Plant your bulb lasagna container in the fall or very early winter, usually between October and December as long as the temperature hasn’t dipped below freezing. If you plant too early when the temperature is warm, the bulbs may sprout shortly after planting instead of waiting until early spring.
- You can keep your bulb lasagna container outdoors, but it is better if you put it in a sheltered location rather than in the middle of the yard to keep it protected from wind and frost. It is important to not put it in a heated greenhouse or garage because some bulbs need a period of cold to break dormancy.
- If the container is outdoors when the temperature is below freezing for multiple days, protect the pot with a blanket, a plant cover, or bubble wrap.
- If you have a wet winter, put the container on a couple of bricks or pieces of wood so the rain will drain through the drainage holes.
- Remember to water the container.
If you Top of Form
Bottom of Form
Top of Form
Bottom of Form
prefer an in-ground garden, you use the same “ingredients” and follow the same “recipe” to plant a bulb lasagna bed in an area of your yard.
You can use your favorite bulbs to make your bulb lasagna, or here are a few plant combinations to give you some ideas.
- Tulips, Daffodils, Crocuses. Plant the tulips in the bottom layer, daffodils in the middle, and crocuses on top. This combination provides color from early to late spring.
- Hyacinths, Narcissus, and Snowdrops. Plant the hyacinths in the bottom layer, narcissus in the middle, and snowdrops on top. This combination provides fragrance from hyacinths, bright colors from narcissus, and beauty from snowdrops.
- Alliums, Muscari, and Anemones. Plant alliums in the bottom layer, muscari in the middle, and anemones on top. This combination provides interest from different shapes and colors.


I was a little skeptical when I first heard about bulb lasagna/bulb layering gardening because I thought there was no way the bottom layer of bulbs would ever grow through the other layers to the top and bloom. I was wrong. Once the bottom bulbs sprout, they weave upwards and go around the other layers of bulbs when they encounter any resistance until they reach the surface.
Bulbs are hardy, and they add beauty and color to the landscape. If you’ve never tried them, this is a great time to plant some to make you smile when they sprout in the spring!
BCMGA offers several education programs each month. There is a program at 6:00 p.m. on the 1st Tuesday of the month at the South Library Branch in the Mall of Abilene, and the same program is offered again at 10:00 a.m. on the 2nd Friday of the month at the Downtown Library. Watch the BCMGA website and Facebook page for the topics and the dates of these monthly programs.
If you have any questions, call the Taylor County Extension Office at 325-672-6048 or email us at mgardeners@yahoo.com. We hope you visit our website at bcmgtx.org for information on all Big Country Master Gardener events, like us on BCMGA Facebook, and check out training presentations on BCMGA YouTube. We are here to help you.
Until next week, Happy Gardening!

